5 Minutes that Matter: Security Blanket
I recently had the opportunity to be involved in the Chelsea Project involving mixed groups of WI members and Chelsea Textile students working towards individual outcomes inspired by recent WI resolutions. I was keen to be involved in the project as I have always made things and felt I had multiple skills and experiences which could be of use to the students. I have always loved the learning process and was curious to have an insight into the workings of Chelsea College of Arts, even remotely via Zoom. On a personal level, I have previously studied Applied Arts at degree level, as a mature student, and missed the sense of drive that comes with making to a brief, for a specific purpose, rather than making for its own sake.
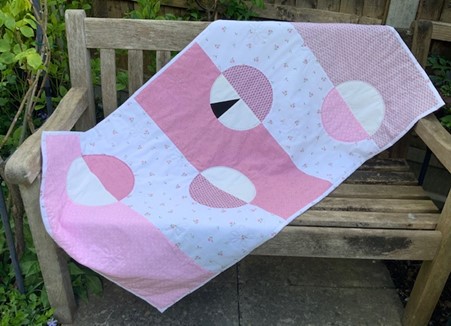 I chose to focus on the “5 Minutes That Matter” campaign which seeks to encourage women to have their smear test. I discovered that one tip to make women feel more comfortable and at home during their test is to take their own cover instead of the usual, clinical “blue paper” provided so I chose to make a “security blanket” incorporating a stylised version of a 5-minute clock and the HPV virus, that can lead to Cervical Cancer. I chose patchwork as I thought it would give a crisp graphic quality to the finished item, but applique would work just as well. In addition, I have written up simplified instructions to allow a form of “activism” in the act of making (not just using) the security blanket to allow members to get into the mindset of going for a smear test by making a security blanket of their own. Being involved in the project has given me a new appreciation for the relevance of WI resolutions, whereas my previous involvement had only been the annual vote at meetings.
You will need
Materials:
- 5 fabric strips 30cm x 74cm or 5 quarter metre lengths of fabric or 5 fat quarters in desired colours, for front and half-circles
- An A6 scrap of black, or a dark coloured, cotton fabric of the same thickness
- An A4 scrap of white, or a light coloured, cotton fabric of the same thickness
- Approx. 145cm x 80cm fabric for the back, an old sheet works well
- Cotton thread in a matching colour for machine sewing
- Perle thread or 3 split strands of embroidery floss, in a contrasting colour for topstitching
- Cotton thread in a contrasting colour for topstitching (optional)
Tools:
- Scissors
- Rotary cutter and cutting mat (optional)
- Quilting or other ruler
- Sewing machine
- Sharp needles of appropriate size for chosen thread
- Iron
To Make
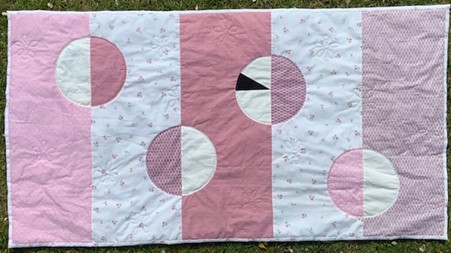
The overall finished size of the blanket is 140cm x 74cm (which is sufficient to cover from waist to knee and drape for coverage on either side) but can be adjusted to fit your frame and whatever fabric you have available. I used 5 strips 30cm x 74cm and part of an old double flat sheet for the back. If you use fat quarters they will need to be cut in half lengthwise and re-joined at the short ends to make a strip.
First, cut the 5 strips for the front to the desired size. Use the off-cuts to cut out the half circles, using the largest template (Download here). It can help to mount the templates on a card but do not use these to guide a rotary cutter as this is not safe!
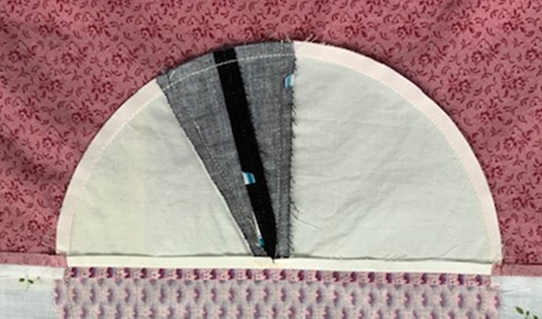
Make one half-circle using templates C, D, and E (Download here) to make the half clockface: cut C and E from white and stitch either side of the and black segment (D). Press seams away from D and carefully trim bulk where the three seams join at a point. (NB: there is an additional seam in the black section pictured above as I pieced together scraps.)
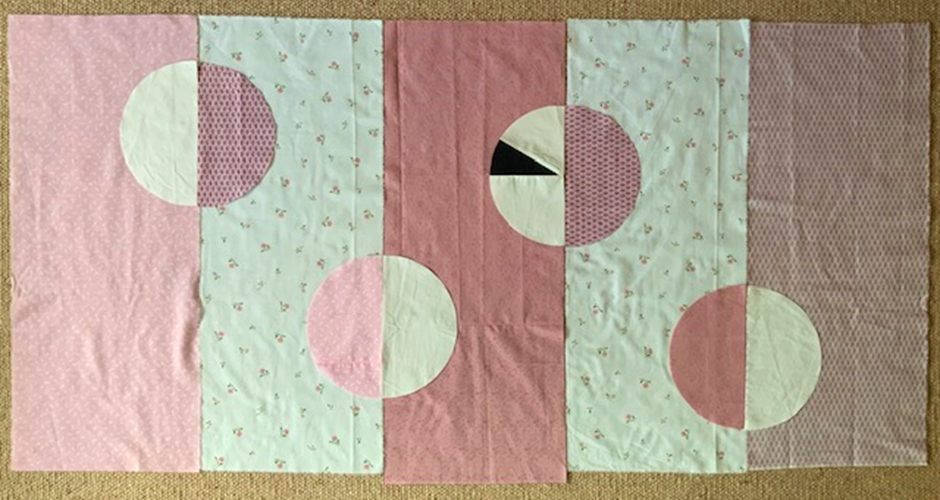
Before stitching anything together, lay out your strips on a flat surface with the short ends matched. Decide where you want the half circles to be positioned, making sure the flat side of each half-circle lines up with the long edge of a strip and its corresponding half circle on the adjoining strip. The greater colour contrast there is between adjoining pieces, the more effective your design will be.
It is easiest to work on one strip at a time, in turn, from one side of the blanket to the other. Pin the half circles to each strip, mark where the top and bottom edge meet the long side of the strip then remove and put to one side. Position template B (the smaller half-circle; download here), on the long edge of the first strip, evenly between the two positioning marks: note that the marks will be wider than the template. Draw around the template then cut out a half-circular “notch” on the strip to insert the larger half-circle. With right sides together pin the curved raw edges together, matching the straight ends. Sew with a ¼ inch (6mm) seam, being careful not to create any folds or pleats. Repeat for each half circle on each strip.
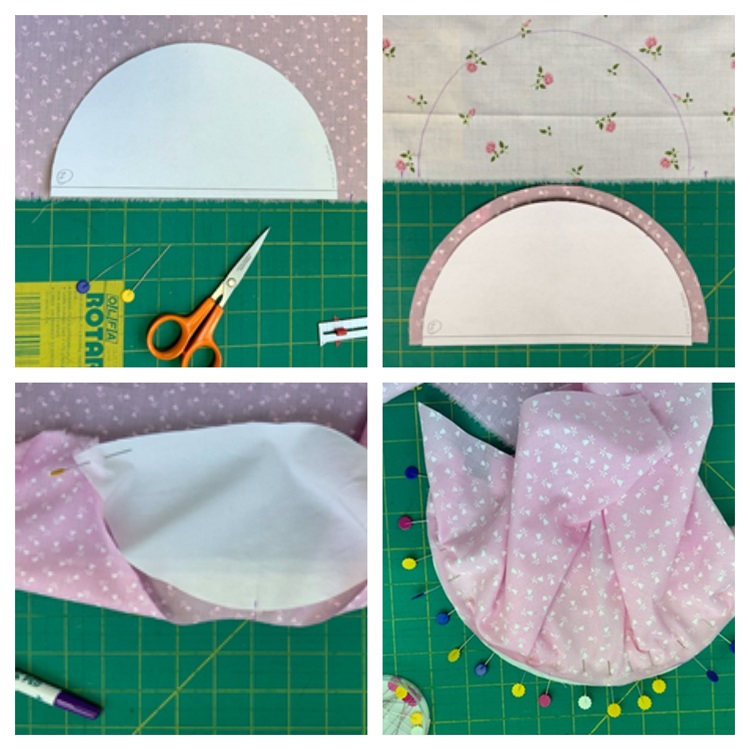
Once all the strips have their half-circles inserted, press the circular seams, flat and closed, to the outside of the circle (see photo 3). Now join the strips, matching both the tops and bottoms of the strips and the edges of each half-circle. Press and trim to straighten edges, square off corners and adjust the size if needed.
(At this point the pattern is simplified from my original which has been traditionally quilted)
Measure the top and cut back to the same size. Placing right sides together and using a ½ inch (12mm) seam, pin then sew front to back around the perimeter, leaving a 20cm gap to allow for turning. Carefully trim corners, turn to the right side, push out points and sides, Press. Make sure the raw edges of the gap are tuned under in line with the seam and then join the gap and topstitch the entire perimeter by machine sewing close to the edge.
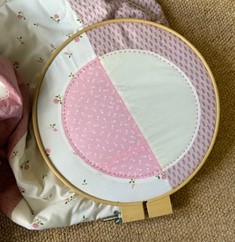
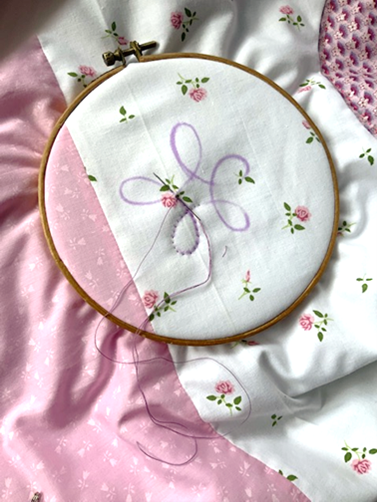
Pin front to back at regular intervals (15-20 cm) to stop slippage and retain shape. Join front to back at each of the circle motifs. Place a large embroidery hoop around each circle in turn and using perle thread, work a running stitch ¼ inch (6mm) inside the edge of the seam. Start and finish each circle by tugging the knotted end of the thread through the top layer of fabric so it sits invisibly between the front and back.
If desired, you can use the same process detailed in the previous step, using a small embroidery hoop and the template provided, to add virus motifs in a contrasting machine sewing thread using a tiny running stitch.
Project by Emma Hayward, Stone Rangers (Leytonstone) WI (Middlesex Federation)
For more information on cervical screening and tips that you can try to make the test easier, please visit Jo’s Cervical Cancer Trust’s website
